
Nowadays, it's truly a pleasure to see daytime running lights on modern cars. Spotting the headlights of modern Mercedes, BMWs, or other brands on the road is quite a sight. But this mostly applies to modern, premium-class cars. Even today, we often see cars with standard halogen headlights that lack any aesthetic details. However, probably all of us have wanted to see those same beautiful headlights and daytime running lights on our own cars.
 |
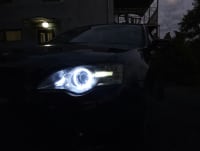
| Subaru Legacy BL5 Headlight With LED |
I had exactly this reaction because my car definitely didn't have them. So, I decided it was time to give my car a modern visual upgrade. But that wasn't the only issue; the car's headlights were already quite damaged and yellowed, which significantly reduced the lighting quality. This kind of project is truly interesting and enjoyable when you know you will love the final result.
First of all, it's essential to talk about how to work on headlights, what nuances to consider, and what tools you will need. When opening a headlight, its hermetic seal is broken, and if not reassembled correctly, water and moisture can easily get inside, causing damage. It's a terrible sight when you perfect your headlights only to watch water ruin them later.
To prevent this, factory headlights use butyl rubber—a liquid sealant—between the housing and the front clear plastic cover. It's quite common for people who don't know this detail to use standard black silicone during reassembly, which won't protect your headlight at all. Surprisingly, I managed to buy it quite cheaply, for just $5. You can easily purchase butyl rubber on various online platforms.
The next crucial tool is an industrial heat gun for heating the headlight, or alternatively, you will need a home oven. You might ask why heating is necessary. Since butyl rubber melts when heated, it allows us to open the headlight without any damage. After working on the headlights, heating is required again to soften the rubber so we can easily and completely seal them back up. I didn't have a large enough oven at home to fit the headlight, so buying an industrial heat gun was necessary. You'll find many heat guns of different brands and power levels; I managed to buy one on sale for just $11.50 on Temu. Most importantly, while opening and cleaning the headlight, I wanted to install modern Angel Eyes. For my Subaru Legacy BL5, the most beautiful and common style is a round angel eye that fits over the chrome ring of the low beam. So, I started researching what style, design, lighting power, and color to choose. For me, the most interesting and beautiful look is a factory-style Daytime Running Light (DRL). Therefore, I immediately ruled out large, opaque bulbs. The absolute best option was acrylic round angel eyes, which have just two LEDs that diffuse light inside the ring from both sides, creating a beautiful, subtle glow. I also wanted to integrate it flawlessly with the headlight's original design to avoid making it look tacky.


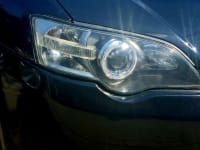
I also ordered cable glands, which are essential to hermetically seal the cable coming out of the angel eye, along with adapter cables and connectors. Then, it was just a matter of waiting for my packages to arrive. In the meantime, I had to evaluate the headlights. This is what they looked like before the project:


I received the items soon after and couldn't wait to start working on them. The old headlights were quite an unpleasant sight. I will cover how I completely cleaned them in a different blog post, but let's dedicate today's blog entirely to the angel eye installation. It is a highly interesting and labor-intensive process if you want maximum results. This isn't just about whitening the headlights; it's a complete renewal and modernization.
The Headlight Removal Process
Removing the headlights on a 2004 Subaru Legacy BL5 is not exactly simple. You will have to remove the front bumper to gain access to the bolts. After removing it, you just disconnect the power source to the headlights, which is very easy. In just half an hour, I had both headlights in my hands. I started removing the screws from the headlight housing and preparing for the next step.
After removing all the bolts and clips, I started heating it. Keep in mind: do not point the heat gun at just one spot, as you will melt the plastic. With simple, sweeping hand movements, distribute the airflow evenly across the entire joint area to soften the butyl rubber inside. For those who have a suitable oven at home, it's much easier—just set it to 50-70°C and wait 5-10 minutes. Heating it at high temperatures is absolutely forbidden.
After heating the headlight, start opening it with a flathead screwdriver. If the rubber is still hard, try applying a bit more hot air. This process should be calm and careful because it's certainly not worth destroying the headlights while trying to open them; that will just cost you a lot more money. Before starting this project, I considered asking a local mechanic to do it all, but the price was $200, which is quite expensive. This depends entirely on your location—Legacy headlights with angel eyes can cost up to $500 in some places. Doing it myself, my total expenses were only around $30-$40. I actually opened the headlights easily because, as it turned out, they had been opened before (and quite poorly).
Angel Eye Installation
One difficult process—opening the headlights—was out of the way, but a second challenge awaited: mounting the angel eyes and making the necessary holes for them. For this, you must have an electric drill. You'll need a 5mm bit for the cable, and since I decided to use very thin wire to mount the angel eyes, you will need a 1mm drill bit for those holes.


Measure the angel eye, mark the exact location where the holes should be drilled, and do it very carefully. The process turned out to be easier than I expected, although I was still very cautious. After drilling, I secured the angel eyes with the wire. The reason for this is that the headlight gets quite hot during operation, and mounting it with glue is a terrible idea. There's a huge chance the glue will melt and the angel eye will simply drop to the bottom of your headlight housing, which would require opening the headlight all over again. Therefore, wire mounting is a much better, permanent solution. Inside the Legacy headlight, you can make three secure wire mounts because the shroud has three distinct plastic design elements near the low beam bulb.
Mounting & Sealing
As I discovered during test-fitting, the 105mm angel eye looked much better and more pleasing. If you want the headlight to look as beautifully factory-standard as possible, I highly recommend the 100-105mm size. I easily secured it with the wires, and the cable fit perfectly through the 5mm hole I prepared under the shroud, passing to the back.
The next step was figuring out where the angel eye cable would exit the back of the headlight housing. This was achieved through the low beam bulb area. Behind the Legacy's headlight, there is a plastic cap that you open to replace the low beam bulb. I decided to mount the cable gland on this very cap. I drilled another hole, and the gland fit in perfectly. In this case, the gland must be very small. Only 2-3 thin cables need to pass through it, and if you use a large gland, the hermetic seal will be compromised. This setup ensured the headlight remained completely watertight.
After routing the cable, the headlight just needed to be sealed up. I gradually scraped off the old sealant and applied the new butyl rubber into the groove, making sure it completely covered every corner. This is crucial for maximum sealing.When you put the two halves of the headlight back together, you will find it won't close completely. This is perfectly normal because the new butyl rubber is hard and needs heat to become soft and pliable again. Repeat the heating process, warming the seal to 60-70°C with sweeping motions. After that, I found that the headlight clicked together perfectly. The final detail was screwing the original bolts back in, and the headlight was hermetically sealed.
The Electrical Wiring
This part made me very happy because only the final detail—the electrical connection—was left. To do this, I had to connect the positive and negative sides of the angel eye cable to the car's parking light (marker light) wiring.
On some cars, this cable comes out separately from the car's electrical harness, but on the Subaru, the marker light wiring doesn't have a separate external plug. I discovered that the cable comes from the main headlight wiring harness inside and connects to the marker bulb. Because of this, I had to splice the wiring inside the headlight itself.
I spliced the positive and negative cables into the marker light cables. There is one very important thing to note here: the electrical splice points must be heavily insulated. I used heat shrink tubing, which shrinks when heated and tightly hugs the cable. It's very cheap, and you can find it in any electrical shop. The splicing was easy. I attached a female connector on the end of the purchased cable and a male connector on the car's side. This isn't strictly necessary, but it's highly recommended to avoid future headaches. If I ever have to replace the angel eye in the future, I can simply unplug the connectors without having to cut the heat shrink and redo the entire wiring from scratch. Save yourself the trouble and do it right the first time.
The Final Result
Finally, putting the headlights back on the car and turning them on was a huge pleasure. Because I kept the headlight design as factory-looking as possible and didn't cut any corners on the technical installation, the results were incredible. The car's overall look completely changed and became much more aggressive and beautiful.
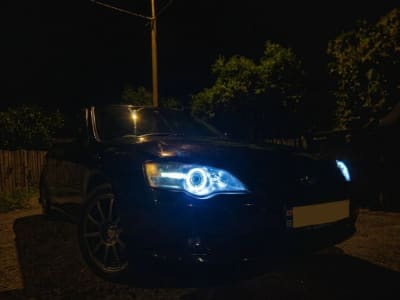
 Testing it was a joy. Evening was approaching, so I immediately started the car and took a drive. I noticed everyone looking at my car the exact same way I used to look at the DRLs of modern premium brands. Believe me, this project was definitely worth it.
In the next blog post, I will tell you how, in parallel with this project, I managed to highly effectively restore and polish the clear plastic surface of the headlights to make them look brand new!
